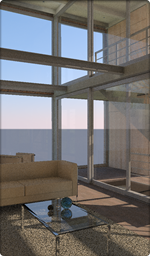
Rendering from AutoCAD Drawings
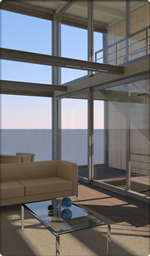
Rendering from Revit 2012
Content
Quick StartBefore You Upload
Uploading
Data Security
Settings
Rendering
Viewing, Downloading and Deleting
Troubleshooting
|
Rendering
|
Set up named views, lighting and other parameters in AutoCAD, exactly the way you want them, before uploading your file to the rendering service. Read on for additional preparation tips.
3D Geometry
The rendering service is only for 3D models. It cannot render 2D geometry or paper space views.Named Views
The rendering service relies on named views or camera objects created in AutoCAD. You can render any or all named views or cameras found in your drawing. Create several named views or cameras prior to uploading your file.Sun and Sky
If you are using sun, sky, and geographic location properties in AutoCAD to visualize your model views, you must create a new Named View based on the working viewport where these settings are applied. Be sure to select the View Properties > Background option, "Sun & Sky" when creating your new Named View.Default Lighting
You must add at least one standard or photometric light to your scene in AutoCAD prior to uploading. The default lighting cannot be used by the rendering service.Materials
If you are using AutoCAD 2010, only the built-in materials that came with the software will render correctly using the rendering service. AutoCAD 2011 files can contain your own custom materials, however, if your drawing uses any custom texture files, you must create an eTransmit file to include these texture files so that the rendering service can access them.Textures
Only image-based textures are supported at this time. Procedural textures, (Checker, Gradient, Marble, Noise, Speckle, Tiles, Waves, and Wood) are not supported.XREFs
If your AutoCAD file relies on any XREFs (externally referenced files), you must use the eTransmit format to gather all these files into a single archive prior to uploading. The rendering service will accept your eTransmit .ZIP file.Minimizing Size
Consider saving a copy of your file that contains just the elements that will appear in your rendered images. Any elements that will not be visible in the rendering will increase the amount of time it takes to upload the file, and may increase the time it takes to render.
Upload a new 3D model, or select a previously uploaded file from the list. Autodesk sample files also appear in the previously uploaded files list.
Click Select File on the Upload screen. Select either a .DWG or eTransmit (.ZIP) file to upload.
Once your file is uploaded you will automatically advance to the Adjust Settings screen.
Upload time depends on the speed of your Internet connection and the size of your file.
Click Cancel while an upload is in progress to cancel uploading a file. Your file will be deleted from the service immediately. Canceling cannot be undone.
Note: If you navigate away from the upload screen or disconnect from the Internet for more than a few seconds while your upload is in progress, the upload will be canceled.
Your previously uploaded files are saved securely in your account, making it unnecessary to re-upload a file when you want to render more images from it later.
There are two ways to use a previously uploaded file:
- On the Select a Source File screen, select a previously uploaded file or an Autodesk sample file from the list at the bottom of the page, then click Continue to advance to the Adjust Settings screen.
- On the My Render Gallery screen, click on the thumbnail menu from any thumbnail image and select Re-render using new settings….
Files you upload to the rendering service are stored at a secure data center. Your source files cannot be viewed or downloaded by anyone. Only a person signed into the rendering service with your user name and password can access the files, and then, only to render them with the service.
After uploading or selecting a previously uploaded file, you will advance to the Adjust Settings screen. Use the controls on this screen to set up one or more renderings of your model.
Click the Add Image button to set up multiple images with different parameters from the same source file.
By default you will receive an email notification when all your images are ready, or if there are any errors that need your attention. Uncheck this option if you do not want to be notified by email.
For each rendering you set up, you can adjust the following settings:
 |
 |
 |
 |
| Very Few Clouds | Few Clouds | Cloudy | Very Cloudy |
|

|
|
|
| Draft | Standard | High | Best |
There are four Render Quality settings in Autodesk® A360 Rendering, each with a different balance of three rendering quality variables: Eye rays, reflection samples, and lighting accuracy.
| Quality Variables | |||||
| Setting | Eye Rays | Reflection Samples | Lighting Accuracy | When to Use | Speed |
| Draft | 0.25 | 1 | Low* | Optimized for speed. Perfect for a quick preview of your scene. | 1x |
| Standard | 4.0 | 1 | Low | More accurate than Draft. Perfect for quick visualization during design. | 4x |
| High | 16 | 8 | Med | Greater detail than Standard. Perfect for high fidelity presentation work. | 10x |
| Best | 32 | 16 | High | Lower noise and broader tonal range than High. Perfect for archival rendering, when speed is not a priority. | 20x |
Note: Speed comparisons shown are relative. The overall rendering time for any image is a function of render quality, image resolution, and complexity of the scene.
Click the Start Rendering button at the bottom of the screen to start rendering.
After clicking the Start Rendering button on the Adjust Settings screen, you are taken to the My Render Gallery screen. Here you can view your completed images and monitor any renderings still in-progress.
A small progress bar appears beneath each image as it is being rendered. Hover over the image with your mouse cursor to reveal an information popup with the details of the image.
Click the Cancel Rendering button on any in-progress thumbnail to stop rendering the image. Canceling a rendering in progress cannot be undone. Click the New Rendering button to start over if you cancel a rendering by mistake.
Once rendering has begun you are free to close your browser window. Check the box Email when complete to receive a notification when your images are ready. Sign in to the rendering service at any time to monitor in-progress renderings and review your completed images.
Once an image is rendered it is moved to a gallery of images from the same source file on the My Render Gallery screen.
Navigate the images in galleries containing more than 7 images using the left and right arrow buttons on either end of the row of thumbnails.
Hover over a thumbnail to review the rendering and image details.
Click on a thumbnail to open a larger preview image of the rendering in your browser window. If the preview is already showing, click the thumbnail to hide it again.
Hover over a thumbnail's ![]() icon to select actions:
icon to select actions:
Re-render using new settings…
Set up one or more new renderings based on the same source file as the image.Show preview image
Open a larger preview image of the rendering in your browser window.Download image
Download the full size rendered image to your computer.Delete image
Permanently delete the image from your gallery, (cannot be undone). Click "Delete All" in the title bar of a gallery if you no longer want any of the images in that gallery.
Panoramas are full 360 degrees views of the scene from the current view camera position. The quality and size of a panorama image is dependent on the quality and size of the view used to create it. if the panorama quality looks poor, re-render the view with a better quality and larger image size, and then create a panorama from the new higher quality image. Panoramas are visible through an embedded panorama viewer. Use the mouse to explore the 360 degrees environment.
My file uploads, but validation fails:
My rendered images don't look like I expected them to:
Make sure that you have included any externally referenced file, including custom materials texture files, by creating an eTransmit archive.
My rendering does not update or respond:
My image fails to render: